
The National Security Agency (NSA) has recently issued an urgent advisory to ensure that all Windows-based systems are fully-patched and updated. BlueKeep is a software security vulnerability affecting computers using older versions of the Microsoft operating system (mainly Windows 7, Vista, XP, windows Server 2008 and 2003); Windows 8 and Windows 10 are unaffected. Microsoft considers the flaw « critical », and recommends installing available update patches as soon as possible to affected systems to mitigate the vulnerability, as well as disabling Remote Desktop Services if they are not required. This is a serious vulnerability and it should be addressed right away.
Archives de Catégorie: Did you know?
Windows 7 – End of the Road
All good things must come to an end, even Windows 7. After January 14, 2020, Microsoft will no longer provide security updates or support for PCs running Windows 7. But you can keep the good times rolling by moving to Windows 10.
You can continue to use Windows 7, but once support ends, your PC will become more vulnerable to security risks. Windows will operate but you will stop receiving security and feature updates.
As long as your PCs meet the hardware requirements, should be able to upgrade to Windows 10, with a valid license.
| Windows operating system | Latest update or service pack | End of mainstream support | End of extended support |
|---|---|---|---|
| Windows XP | Service Pack 3 | 14 April 2009 | 8 April 2014 |
| Windows Vista | Service Pack 2 | 10 April 2012 | 11 April 2017 |
| Windows 7 | Service Pack 1 | 13 January 2015 | 14 January 2020 |
| Windows 8 | Windows 8.1 | 9 January 2018 | 10 January 2023 |
| Windows 10 | Service updates provided every March and September | Refer to Microsoft Product Lifecycle database | 14 October 2025 |
What is IaaS?
 Infrastructure as a service (IaaS) is a form of cloud computing that provides virtualized computing resources over the internet.
In an IaaS model, a cloud provider hosts the infrastructure components traditionally present in an on-premises data center, including servers, storage and networking hardware, as well as the virtualization or hypervisor layer.
The IaaS provider also supplies a range of services to accompany those infrastructure components. These can include detailed billing, monitoring, log access, security, load balancing and clustering, as well as storage resiliency, such as backup, replication and recovery.
IaaS customers access resources and services through a wide area network, such as the internet, and can use the cloud provider’s services to install the remaining elements of an application stack. For example, the user can log in to the IaaS platform to create virtual machines; install operating systems in each VM; deploy middleware, such as databases; create storage buckets for workloads and backups; and install the enterprise workload into that VM
SSD Hard Drive
A hard drive is essentially a metal platter with a magnetic coating that stores your data. A read/write head on an arm accesses the data while the platters are spinning.
An SSD does functionally everything a hard drive does, but data is instead stored on interconnected flash memory chips that retain the data even when there’s no power present.
SATA drives come in varying speeds and capacities and SSD drives come in varying capacities. SSDs so much quicker than conventional SATA drives because there are no moving parts, there is no spinning disk like you would find in a SATA drive that has to read and write data to an actual disk. Boot up time is much quicker, cutting it down by 50 percent or more. SSDs are also lighter than the average SATA drive which makes it a great choice for a laptop drive. The one drawback to buying an SSD is cost, as these are pricey hard drives.
Types of SSL/TLS Certificates
Today there are three types of certificates that offer 3 levels of user trust for SSL/TLS negotiations:
Domain Validated certificates (DV), Organization Validated certificate (OV) and Extended Validation certificates (EV).
Domain Validated Certificate
This type of certificate validates that the domain is registered and someone with admin rights is aware of and approves the certificate request. The validation can take from a few minutes to a few hours. The Domain Validated SSL certificate is the most common SSL certificate type because it’s fast to purchase. This validation type is sufficient for the majority of businesses and cheaper compared to Company or Extended validations.
If the certificate is valid and signed by a trusted authority, the browsers indicate a successfully secured HTTPS connection.
Organization Validated Certificate
Organizational certificates are Trusted and they are authenticated by real agents against business registry databases. Additional business documents may be required and the business may be contacted during validation to prove the right of use. OV certificates therefore contain legitimate business information. This is the standard type of certificate required on a commercial or public facing website.
Extended Validation Certificate
The Extended Validation certificate requires an extended validation of the business. It validates domain ownership and organization information, plus the legal existence of the organization. It also validates that the organization is aware of the SSL certificate request and approves it. The validation requires documentation to certify the company identity plus a set of additional steps and checks. The order can take from a few days to a few weeks, due to the extended validation process. The Extended Validation SSL Certificates are generally identified with a green address bar in the browser containing the company name.
WHOIS Protocol
Le WHOIS est un protocole de requête / réponse qui est largement utilisé pour interroger des bases de données contenant des informations sur les ressources Internet telles que les noms de domaine et les allocations d’adresses IP.
Créé dans les années 1980, WHOIS a commencé comme un service utilisé par les opérateurs Internet pour identifier les personnes ou entités responsables du fonctionnement d’une ressource réseau sur Internet. Le service WHOIS est depuis devenu un outil utilisé à de nombreuses fins.
De nos jours, le protocole WHOIS est principalement utilisé par les déclarants et les utilisateurs pour interroger les bases de données du registre de domaine afin d’obtenir des informations sur les noms de domaine et vérifier la disponibilité des noms de domaine.
Un serveur WHOIS écoute sur le port TCP 43 pour les requêtes des clients WHOIS. Le client WHOIS envoie une requête de texte au serveur WHOIS, puis le serveur WHOIS répond avec du contenu textuel. Toutes les demandes sont terminées avec ASCII CR puis ASCII LF. La réponse peut contenir plus d’une ligne de texte, de sorte que la présence de caractères ASCII CR ou ASCII LF n’indique pas la fin de la réponse. Le serveur WHOIS ferme sa connexion dès que la sortie est terminée. La connexion TCP fermée est l’indication au client que la réponse a été reçue.
Hyper-V: How to add more than 4 cores to a virtual machine
Windows Server 2008 R2 Hyper-V supports 4 cores per VM. Windows 8 Server will give us a lot of new features and upgrades, and will also support more than 4 cores per VM. They might even add multiple core support to the next SP for Server 2008 R2.

There is a way to add more cores to your VM by editing your VM’s XML file:
Step 1: Shut down your virtual machine
Step 2: Locate and open the XML configuration file of your VM. You can find the (default) location in the Hyper-V settings in the actions pane.
Step 3: Edit the <count type=”integer”> setting and change the number in the desired amount of cores.
<processors>
<count type=”integer”>8</count>
….
….
< /processors>
Step 4: Save the file
Step 5: Start the server and check in the task manager if your server has the correct amount of cores.
Wi-Fi KRACK Vulnerability – WPA2
There is a new security flaw in Wi-Fi protocols WPA2 known as “KRACK” that has recently been discovered. This vulnerability is widespread and affects a large number of wireless infrastructure devices (whether at home, in a coffee shop, at a hotel or in an office).
 In essence, this vulnerability allows an attacker to read information that was previously assumed to be safely encrypted over Wi-Fi. Although it is difficult for the average person to hack your system, this is a weakness that is worth being aware of.
Companies including Apple, Microsoft, Google and others have already begun issuing security patches, and it is imperative that you keep your devices up to date to prevent this vulnerability from being exploited. If you have not already done so, please install the latest updates available for your mobile devices (phones, tablets and computers). This will help remedy the situation.
Also, if you use Wi-Fi at home, feel free to check with your provider to ensure that they are addressing this issue as well and that you are protected.
When connecting to a wireless network that you don’t know for sure is secure, avoid accessing and sharing sensitive information (passwords, banking information, etc…) until systems have been patched on a more global scale.
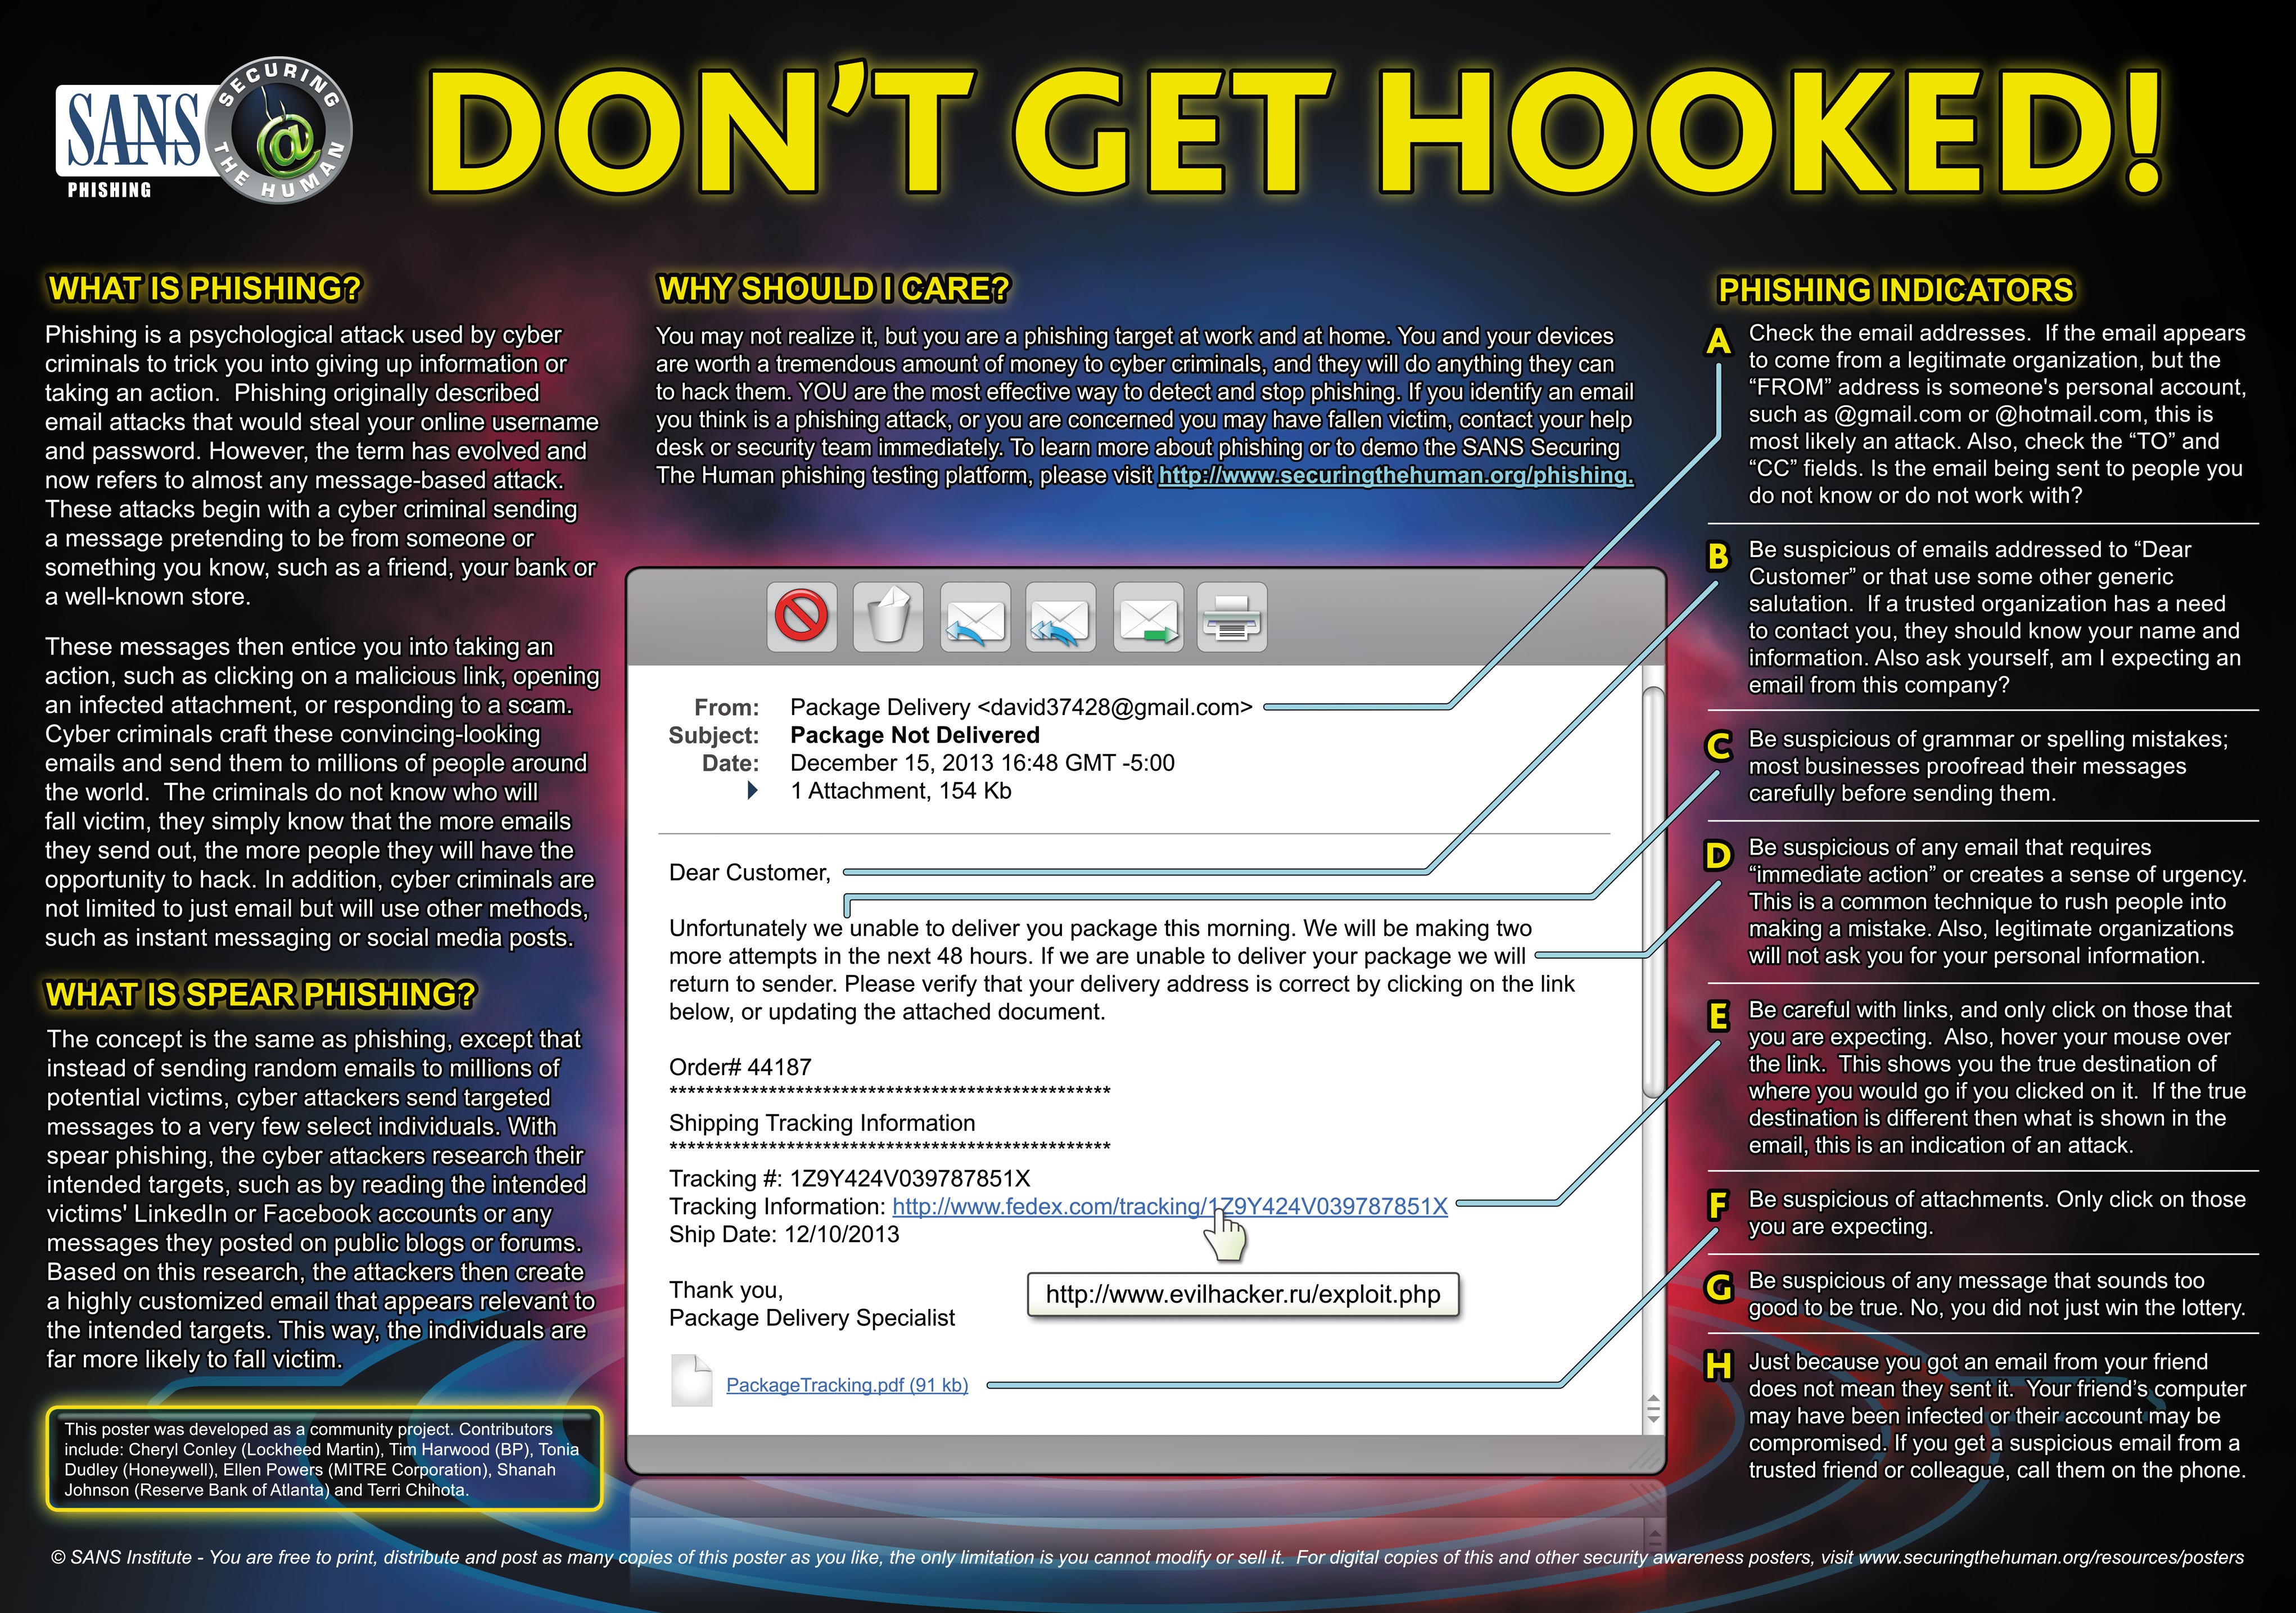
Email Threats
Just to reminder to be cautious when dealing with emails received from both known and unknown sources. You are probably familiar with phony shipping notices, fake lottery notifications and fake invoice documents. Added to that, there have been instances of legitimate businesses email system being compromised, resulting in malicious emails being sent from the accounts of current or old employees of those companies.
So, just because you receive an email from what appears to be one of your genuine contact doesn’t necessarily means that the email is safe. Analyze the content of the email, do not click on links or open attachments unless you know what they are about or expect them. If you are unsure about the trustworthiness or authenticity of a particular email, please contact your IT team and we’ll advise accordingly.
Keep in mind that these threats affect both your work and personal email accounts. Because you receive an email from a relative doesn’t necessary mean that they sent it or that it is genuine.
Disable or Remove Mailbox in Exchange 2010
Disable: will remove the Exchange attributes for the user account but leave the user account in Active Directory. The mailbox is then also left in the Exchange mailbox database until the retention period (30 Days) has passed, then it is removed permanently.
Remove: will remove both the Exchange mailbox and the user account from Active Directory.
Note: Disable is the safest option, because you can quickly reconnect the mailbox to the user again if it is still within the retention period.

i. Go to Exchange Management Console >> Microsoft Exchange >> Microsoft Exchange On Premises >> Recipient Configuration:
ii. Right Click on Mailbox, you will see two options, Disable or Remove.
