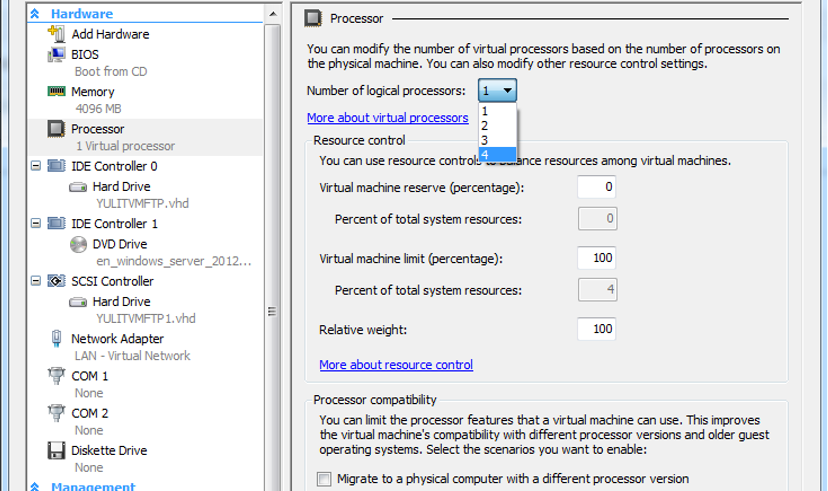
Hyper-V: How to add more than 4 cores to a virtual machine

Windows Server 2008 R2 Hyper-V supports 4 cores per VM. Windows 8 Server will give us a lot of new features and upgrades, and will also support more than 4 cores per VM. They might even add multiple core support to the next SP for Server 2008 R2.

There is a way to add more cores to your VM by editing your VM’s XML file:

Step 1: Shut down your virtual machine
Step 2: Locate and open the XML configuration file of your VM. You can find the (default) location in the Hyper-V settings in the actions pane.

 Step 3: Edit the <count type=”integer”> setting and change the number in the desired amount of cores.

<processors>
<count type=”integer”>8</count>
….
….
< /processors>

 Step 4: Save the file
Step 5: Start the server and check in the task manager if your server has the correct amount of cores.

Wi-Fi KRACK Vulnerability – WPA2

There is a new security flaw in Wi-Fi protocols WPA2 known as “KRACK” that has recently been discovered. This vulnerability is widespread and affects a large number of wireless infrastructure devices (whether at home, in a coffee shop, at a hotel or in an office).
In essence, this vulnerability allows an attacker to read information that was previously assumed to be safely encrypted over Wi-Fi. Although it is difficult for the average person to hack your system, this is a weakness that is worth being aware of.
Companies including Apple, Microsoft, Google and others have already begun issuing security patches, and it is imperative that you keep your devices up to date to prevent this vulnerability from being exploited. If you have not already done so, please install the latest updates available for your mobile devices (phones, tablets and computers). This will help remedy the situation.

Also, if you use Wi-Fi at home, feel free to check with your provider to ensure that they are addressing this issue as well and that you are protected.
When connecting to a wireless network that you don’t know for sure is secure, avoid accessing and sharing sensitive information (passwords, banking information, etc…) until systems have been patched on a more global scale.

Email Threats

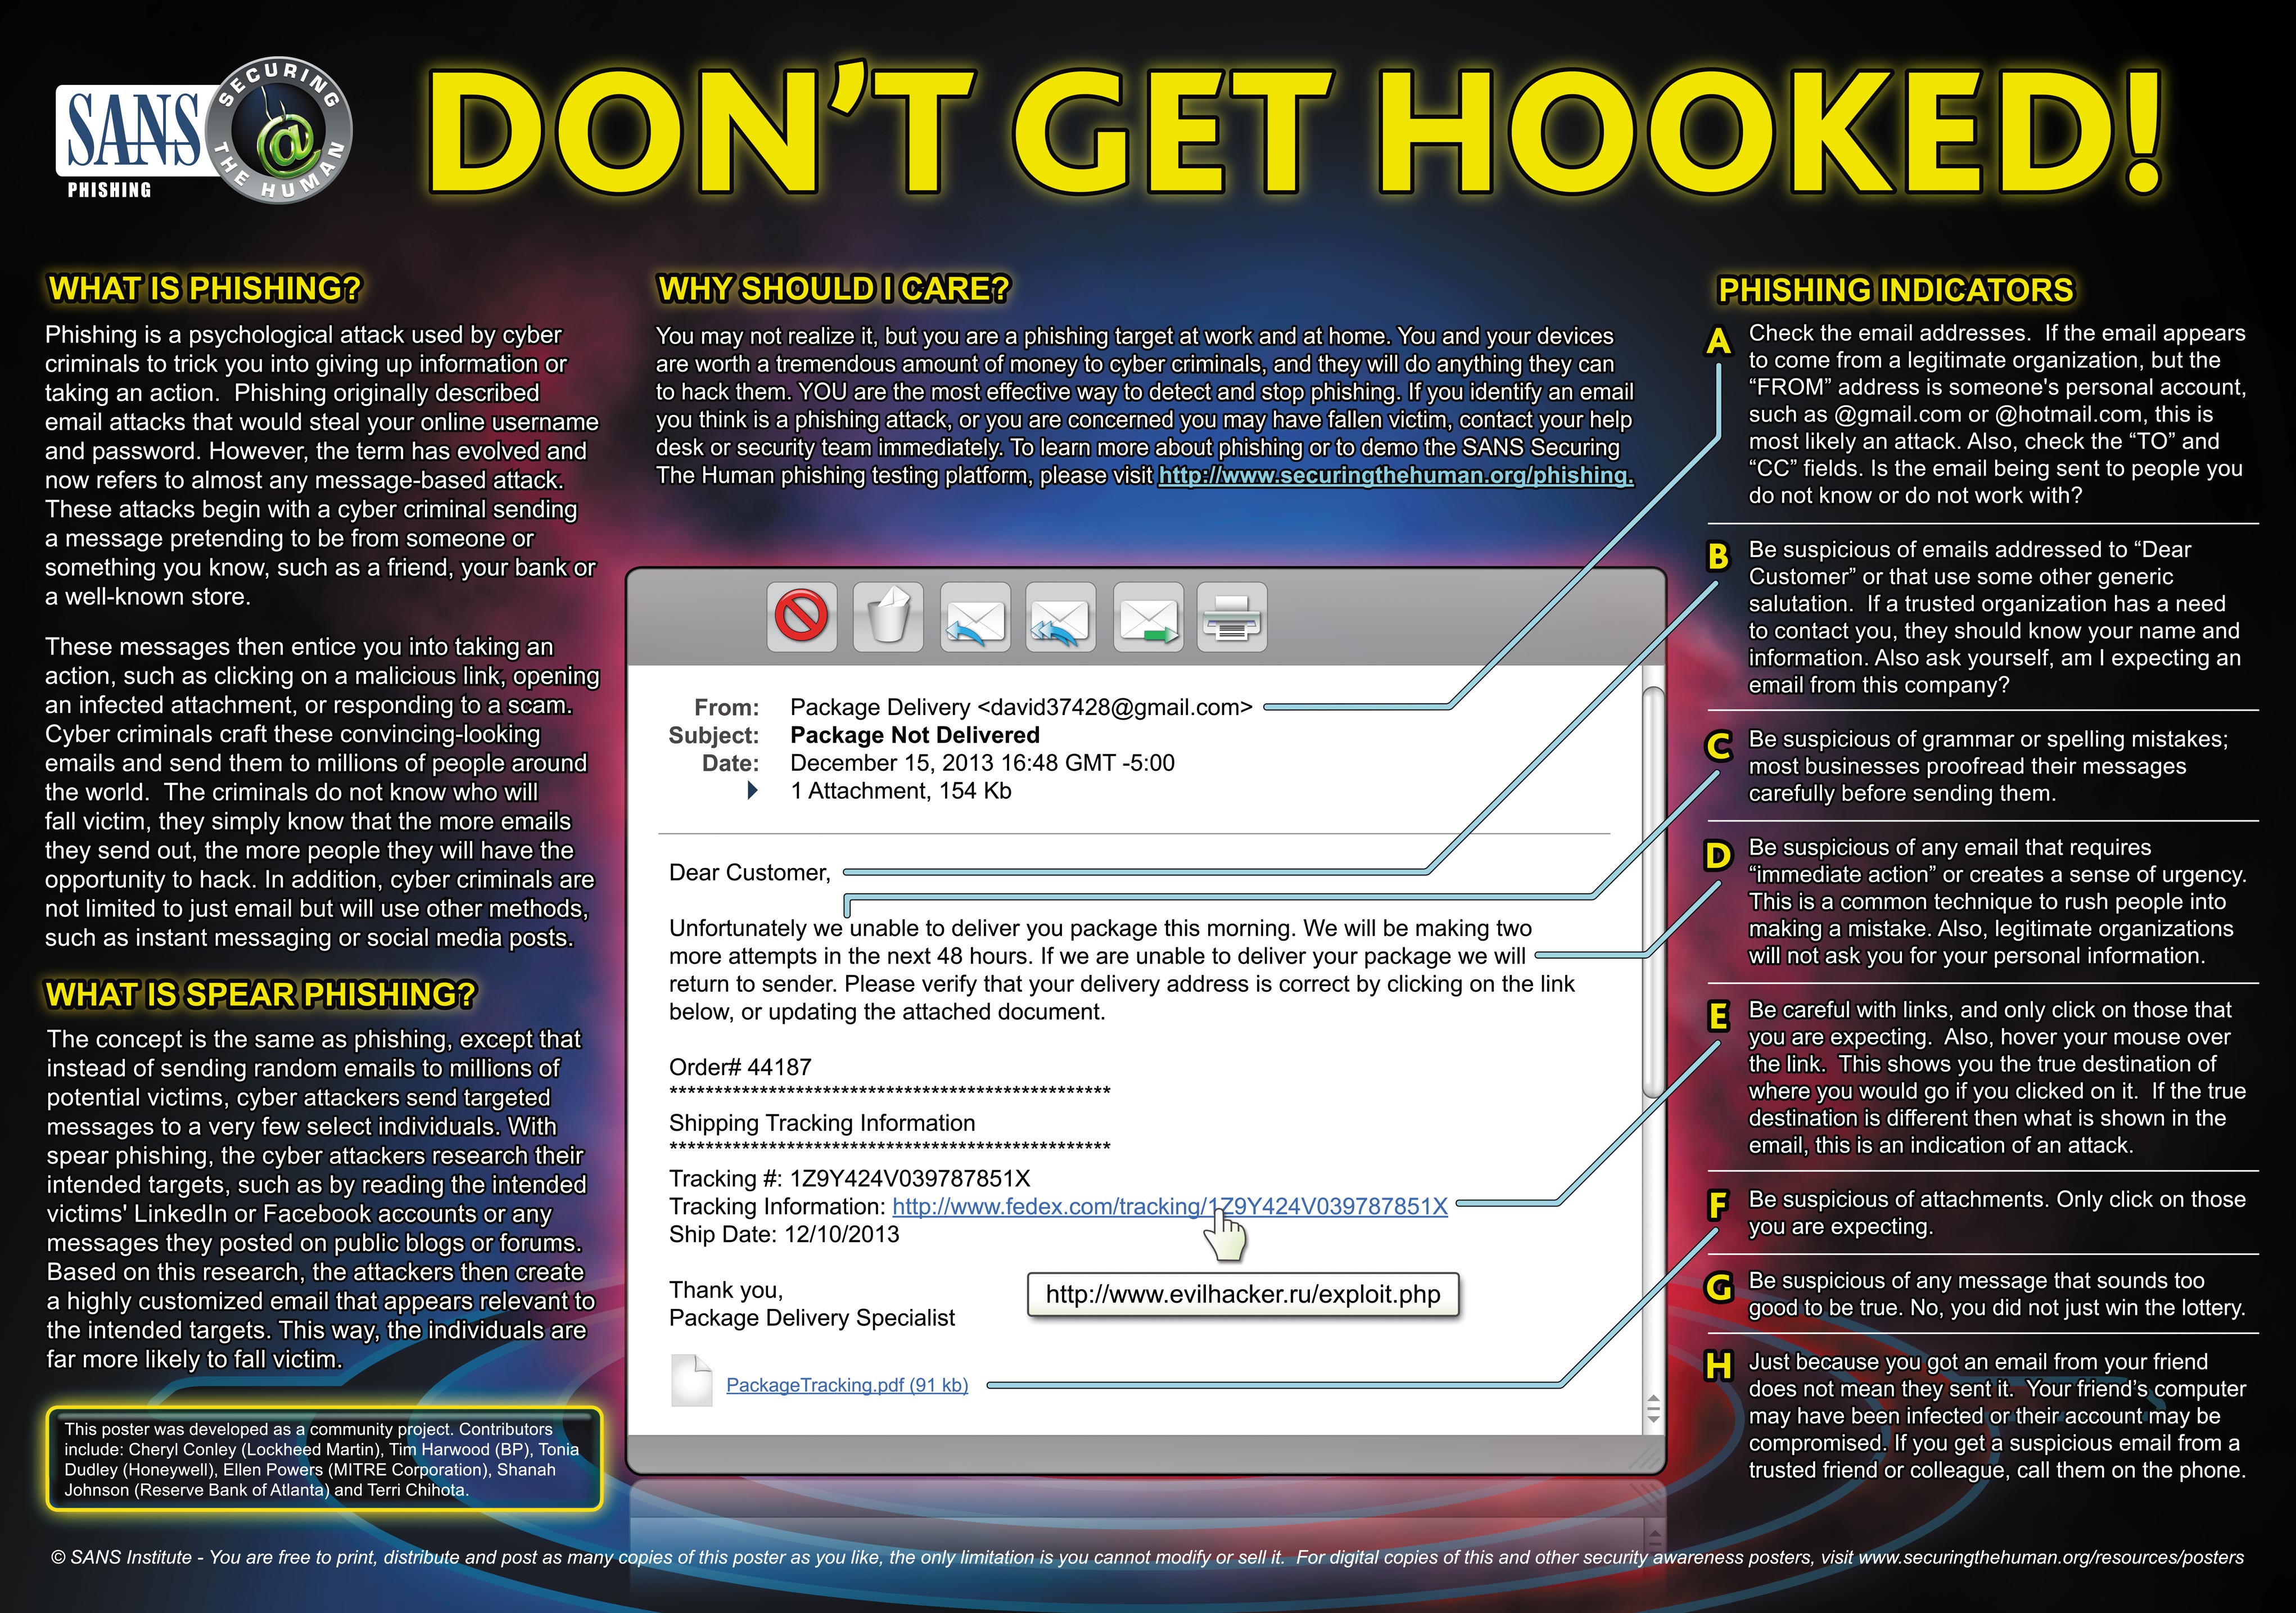
Just to reminder to be cautious when dealing with emails received from both known and unknown sources. You are probably familiar with phony shipping notices, fake lottery notifications and fake invoice documents.  Added to that, there have been instances of legitimate businesses email system being compromised, resulting in malicious emails being sent from the accounts of current or old employees of those companies.

So, just because you receive an email from what appears to be one of your genuine contact doesn’t necessarily means that the email is safe. Analyze the content of the email, do not click on links or open attachments unless you know what they are about or expect them. If you are unsure about the trustworthiness or authenticity of a particular email, please contact your IT team and we’ll advise accordingly.

Keep in mind that these threats affect both your work and personal email accounts. Because you receive an email from a relative doesn’t necessary mean that they sent it or that it is genuine.

Disable or Remove Mailbox in Exchange 2010

Disable: will remove the Exchange attributes for the user account but leave the user account in Active Directory. The mailbox is then also left in the Exchange mailbox database until the retention period (30 Days) has passed, then it is removed permanently.

Remove: will remove both the Exchange mailbox and the user account from Active Directory.

Note: Disable is the safest option, because you can quickly reconnect the mailbox to the user again if it is still within the retention period.

1
i. Go to Exchange Management Console >> Microsoft Exchange >> Microsoft Exchange On Premises >> Recipient Configuration:
ii. Right Click on Mailbox, you will see two options, Disable or Remove.


What is DLP (Data Loss Prevention)?

Data loss prevention (DLP) is a strategy for detecting and preventing potential data breaches. It makes sure that end users do not maliciously send sensitive or critical information outside the corporate network. The term is also used to describe software products that help a IT professionals control what data end users can transfer.

DLP software products use business rules to classify and protect confidential and critical information, so that unauthorized end users cannot accidentally or maliciously share data whose disclosure could put the organization at risk.

Differences between 2.4GHz and 5GHz Wireless

The primary difference between the 2.4 GHz and 5GHz wireless frequencies is range as the 2.4GHz frequency is able to reach farther than the 5GHz frequency. This is a result of the basic characteristics that waves attenuate much faster at higher frequencies. So if you are more concerned with the coverage, you should select 2.4GHz rather than 5GHz.
The second difference is the number of devices on the frequencies. 2.4GHz suffers more interference than 5GHz.
  1. The older 11g standard only uses the 2.4GHz frequency, majority of the world is on it. 2.4 GHz has fewer channel options with only three of them non-overlapping, while 5GHz has 23 non-overlapping channels.
  2. A lot of other devices are also on the 2.4 GHz frequencies, the biggest offenders are microwaves and cordless phones. These devices add noise to the medium that can further decrease the speed of wireless networks.
In both aspects, choosing to deploy on the 5GHz frequency is the much better option as you have more channels to use to isolate yourself from other networks and there are far fewer interference sources.
But the radar and military frequency is also 5GHz, so 5GHz wireless may also have some interference, and many countries require that wireless devices working on 5GHz should support DFS(Dynamic Frequency Selection) and TPC(Transmitting Power Control).
Summary:
  1. 5GHz has a shorter range compared with 2.4GHz;
  2. The 2.4GHz frequency is way more crowded than 5GHz, devices on 2.4GHz suffer much more interference than the ones on 5GHz;
  3. Fewer devices are capable of using the 5GHz channel than the 2.4GHz channel.

If there is too much interference around and your clients support 5GHz, it’s recommended to use 5GHz wireless network, otherwise you’d better select 2.4GHz.

Mise en place de WSUS en WORKGROUP

Contrairement à ce que l’on pense il est possible de mettre en place un WSUS pour un ou plusieurs PC qui ne serait pas dans un domaine. Autrement dit, pour des machines qui se trouvent au sein d’un « groupe de travail », nommé par défaut « WORKGROUP » sous Windows.

Pour cela il vous faut bien sur un serveur WSUS correctement configuré, et le logiciel: WSUS ClientManager for Workgroups

Pour télécharger le logiciel: WSUS ClientManager for Workgroups

WSUS ClientManager for Workgroups est un utilitaire qui est relativement pratique et simple à utiliser, il pourra vous faire gagner de précieuses heures de mises à jour. Le tout sans nécessiter un environnement en mode domaine !

L’avantage de ce logiciel c’est qu’il évite de configurer manuellement les clés de registre.

Non-Administrateurs Qui gére Hyper-V

Les derniers systèmes d’exploitation de Microsoft, à savoir Windows 8, Windows 8.1, Windows Server 2012 et 2012 R2, intègre un nouveau groupe de sécurité local qui permet à des utilisateurs non-administrateurs de la machine de gérer totalement l’application Hyper-V, et ce sans limite.

Ouvrez le gestionnaire de système sur votre machine : “Windows + X” – “Gestion de l’ordinateur“.

hyperv56

Une fois la console ouverte, cliquez sur “Outils système“, “Utilisateurs et groupes locaux“. Sous “Groupes” vous trouverez un groupe nommé “Administrateurs Hyper-V“.

hyperv57

Pour ajouter un utilisateur dans ce groupe, double cliquez dessus et de cliquer sur “Ajouter“.

L’ensemble des utilisateurs ajoutés à ce groupe de sécurité bien spécifique pourront accéder à la console d’administration d’Hyper-V et gérer totalement l’hyperviseur.

Par ailleurs, ces utilisateurs ne sont pas pour autant Administrateurs de la machine, c’est donc un accès privilégié, mais limité.

WSUS Content Folder is Full

Problem:

You’ve run out of space on your server and you find out that the WSUS Content Folder is full and it’s eating up space. The WSUS is Windows idea of a centralized update service. In theory, it downloads all the updates for your environment and then distributes them. It does not do a good job of cleaning itself up (consider the manual wizard cleanup) and it comes preconfigured to download the updates for all Windows products, not just the ones you need. As well, when you run the Cleanup Wizard, the console crashes.

Solution:

1. Open up WSUS Console
2. Go to options and only select the updates for the products you need


How to Do a Reset:

Note: You may want to execute the procedure below during off hours as your WSUS server will be downloading quite a bit of data.

1. Close any open WSUS consoles.
2. Go to Administrative Tools – Services and STOP the Update Services service.
3. In Windows Explorer browse to the WSUSContent folder (typically D:\WSUS\WSUSContent or C:\WSUS\WSUSContent)
4. Delete ALL the files and folders in the WSUSContent folder.
5. Go to Administrative Tools – Services and START the Update Services service.
6. Open a command prompt and navigate to the folder: C:\Program Files\Update Services\Tools.
7. Run the command WSUSUtil.exe RESET

This command tells WSUS to check each update in the database, and verify that the content is present in the WSUSContent folder. As it finds that the content is not present in the folder, it executes a BITS job to download the content from Microsoft. This process takes quite a bit of time and runs in the background.

C’est quoi le DFS?

L’acronyme DFS signifie « Distributed File System » c’est à dire Système de fichiers distribués.

Ce système de fichier hiérarchisé permet de structurer les fichiers partagés sur différents serveurs du réseau de façon logique. Il permet de référencer un ensemble de partages qu’il faudra rendre accessibles de manière uniforme puis, de centraliser l’ensemble des espaces disponibles sur cet ensemble de partages.

Avec le DFS, l’utilisateur final ne visualise pas le nom du serveur sur lequel il accède pour lire les données, cela est totalement transparent. L’avantage c’est que si le serveur vient à changer à cause d’une panne ou pour cause d’évolution, le chemin d’accès restera le même.

Derrière un même chemin d’accès DFS peuvent se cacher plusieurs serveurs, contenant les mêmes données avec une synchronisation entre ces serveurs grâce à DFSR (DFS Replication). Cette approche est très intéressante pour de la haute disponibilité de données et de la répartition de charge.

Bien sûr, il est possible d’utiliser un chemin pour un serveur (1 pour 1), où chaque serveur hébergera des données différentes.

Le DFS étant de plus en plus présent, désormais il est même utilisé pour la réplication SYSVOL sur un domaine Microsoft entre les contrôleurs de domaine.